
 Last modified:
Sunday, 26-Aug-2018 13:01:22 UTC. Authored by: Rebecca J. Parker (rjp43 at pitt.edu | Twitter: @bcpkr396) Edited and maintained by: Elisa E. Beshero-Bondar
(ebb8 at pitt.edu). Powered by firebellies. Last modified:
Sunday, 26-Aug-2018 13:01:22 UTC. Authored by: Rebecca J. Parker (rjp43 at pitt.edu | Twitter: @bcpkr396) Edited and maintained by: Elisa E. Beshero-Bondar
(ebb8 at pitt.edu). Powered by firebellies.
Last modified:
Sunday, 26-Aug-2018 13:01:22 UTC. Authored by: Rebecca J. Parker (rjp43 at pitt.edu | Twitter: @bcpkr396) Edited and maintained by: Elisa E. Beshero-Bondar
(ebb8 at pitt.edu). Powered by firebellies. Last modified:
Sunday, 26-Aug-2018 13:01:22 UTC. Authored by: Rebecca J. Parker (rjp43 at pitt.edu | Twitter: @bcpkr396) Edited and maintained by: Elisa E. Beshero-Bondar
(ebb8 at pitt.edu). Powered by firebellies.When we work together on a computer file, we need a way to save it that helps to keep track of each change made to it,
so our work is stored safely and so we do not create many different copies of the same file and get confused trying to figure out
which is the most current or the best one to keep. When we are working on coding projects, alone or in groups, we need to share our files in the cloud
, or a shared internet directory, and we also need to keep track of each stage of the coding process, the changes we made on our own local
computers before sharing with the group. Sometimes we have to go back and restore something we did in an early stage that we deleted later. Each saved stage of a file’s existence is a version, and there are a number of software tools available to store safely all those versions that we care about. Some of these tools are more thorough and reliable, safer to use than others, and Git is probably the most reliable and very widely used in the coding community, because of its distinctive way of storing all local changes ever made to a file.
Git is a version control system, or a system designed to manage changes to computer files by storing a memory of each version they have taken over time. Some version control systems (like Dropbox) do this in a centralized way by keeping one master copy of a file and storing all history of its changes in a single location in the cloud (remotely). In Dropbox, if two users share a file directory, and each person attempts to change the same file, they each make a change locally, but run into a problem if they try to save their file in the same shared file location in the Dropbox cloud. If they save changes at around the same time, the centralized system creates a copy of one of the files with an altered file name (usually by putting a (1) or a (2) at the end of the original filename in Dropbox), and the owners of the directory must then decide which version to keep or how best to reconcile the two versions. Git, by contrast, would record the differences between the files as a new state of the file’s existence, and that is because it is a distributed or decentralized version control system, a system in which each storage repository carries its own distinct history. People who collaborate on a project upload and download shared versions of files from a web-based storage space called a remote origin repository, but when they work with those remote files they create copies of them on their own computers in a location known as a master repository, and Git manages information about their local version history as well as their remote history.
Git basically tracks each change you have deliberately committed to a directory, like taking a set of snapshots to record the condition of each significant state change that you record every time you make a commit. Every time you commit (or save) the state of your project with Git, it basically takes a picture of what all your files look like at that moment and stores a reference to that snapshot. To be efficient, if files have not changed, Git doesn’t store the file again, just a link to the previous identical file it has already stored. Advanced Git users may quite deliberately try to keep their local working repository different from the shared remote repository because they are working on something unstable that may not be usable by their team yet. When such an advanced user is finally ready to commit a change to the remote repository, their team members may review and reject the commit if they find something wrong with it. Git connects multiple local repositories but preserves each one’s distinct version history, and when GitHub users push their local repository files to a remote repository, they make it possible for other GitHub users to pull in those files and continue to work with them, giving them new homes and local histories. The way in which Git users interact with each other and make files available through remote repositories is sometimes described as a web of trust, in which files can be developed in multiple locations and shared with others based on their merit, and can be denied or rejected when they cause problems.
So let’s say you and a team member are both updating the same XML document inside of your
shared repository. You make your changes, save them, and upload them back to the shared
repository. The problem, for most VCSs, comes when your team member is working on the
same document as you at the same time. One of you is about to have your work
overwritten; however, Git keeps that from happening. You and your fellow team member can
each upload your revisions to the same document, and Git will save two versions of the
file. If you both were working on different parts of the same document Git will
automatically merge your changes together without losing any work along the
way. If you both happen to edit the exact same segment of code Git will issue a
merge conflict to point out where the two files differ allowing you and
your team to decide what version to keep. You can even revert to an earlier version at
any time, relying on the snapshot
that Git preserved of every change ever
committed by all project collaborators.
One of the most important aspects of Git is its emphasis on local operation. Git doesn’t need to go out to the server to get the history of a project and display it for you – it simply reads it directly from your local computer. This means you see the project history almost instantly, without having to wait for server network lag. This also means that there is very little you can’t do if you’re offline. When you manage a project using Git, you keep copies of all the project files on both your local machine and the online GitHub server. You work on your local machine, periodically pushing your changes onto the server so they’ll be accessible to your project partners, and periodically pulling changes made by your project team from the server to your local machine. So as long as you have recently pulled in any changes you can work offline until you are ready to push your changes. For more information regarding what Git is and the benefits of using Git please visit the online version of Pro Git, a Git how-to guide.
Unlike the Graphical User Interfaces (GUIs), the command line (sometimes called the
shell or terminal) is the only place you can take advantage of
all the functions Git has to offer. The GUIs only implement the simplistic functionality
of Git as a means to use Git at the most basic level. For many of us the command line is
strange and unfamiliar, but it used to be the main way that people interacted with
computers before GUIs came to dominate the computer experience. The command line is a
place where people can work more freely and have many powers to process files, powers
that are usually not available or far more difficult to access in software GUI
interfaces. Think of the command line as a way to navigate and work with your computer’s
files and systems by typing commands (strings of text) at prompts, instead of using the
mouse. GitHub offers a helpful, interactive tutorial on using the Git command-line interface. To
learn more about the power tools you can work with at command line, see Lifehacker’s A Command Line Primer for Beginners
.
Below is a list of key terms you will need to understand while using Git and GitHub. Each of these terms will be discussed in greater detail throughout this tutorial, but think of this as your quick reference guide to the basics.
revision, this is an individual change to a file (or set of files). It’s like when you save a file, except with Git, every time you save it creates a unique ID (the
SHAor
hash) that allows you to keep record of what changes were made when and by who. Commits usually contain a commit message which is a brief description of what changes were made.
The above definitions are compiled from the following three sites, which can be visited for definitions of even more Git terms: kernel.org, betterexplained.com, and help.github.com
Because GitHub is a social networking site, where people post their code so that it will
be accessible to others, using it requires creating an account. You can create a free
account by navigating to github.com. You are not required to create an account using your pitt.edu address;
however, associating an educational email address with your account may give you
additional benefits (including five free private repos). To
create your account, enter a user name, email address, and password and then click the
green button that says Sign up for GitHub
. Be sure to select the free option, and
then click the green button that says Finish sign up
. After creating your
account, GitHub will prompt you to verify your email address and decide on the frequency
of GitHub email notifications. Make sure to follow the link in the verification email.
It is important while you are enrolled in this coding course that you regularly checking
GitHub so you may decide to allow all notifications (knowing you
can change this later). You will then be directed back to your account.
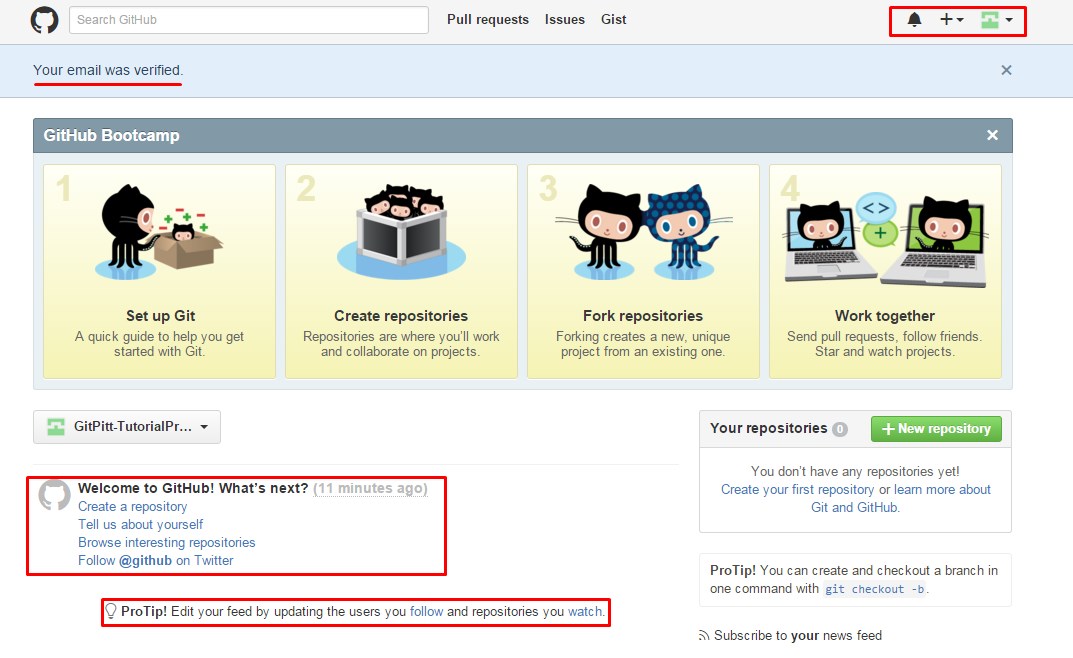
Note: We have highlighted some recommended features of your GitHub account that you should take some time exploring further.
Git is available for download on all three of these platforms: Linux, Mac, and Windows. To download Git on your local machine follow the instructions available on the git-scm.com site. Since platform downloads differ we are not going to go through a step-by-step installation process.
Our suggested settings for a Windows installation are as follows:
Adjusting your PATH environment, we recommend selecting
Use Git Bash onlyas it provides an unmodified PATH.
Configuring the line ending conversations, we recommend choosing the option to
Checkout Windows-style, commit Unix-style line endings.
Git Bash; make sure the box to create this shortcut is checked.
Installation on a Mac is much simpler. For a detailed installation guide, we suggest following this tutorial for assistance while setting up Git on a Mac.
Now that you have Git on your computer you can access it through command line. On a
Windows installation you will be using the Git Bash command shell
and on a Mac
installation you will be using Terminal
.
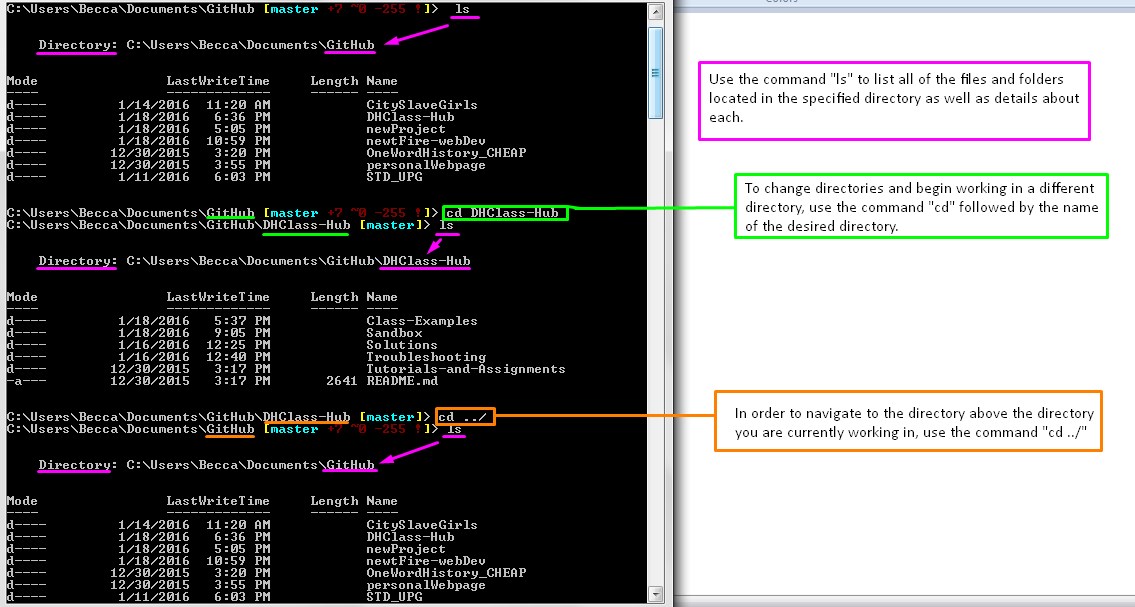
The key thing to working with Git is always knowing where to find your files in the
Finder (on Mac) / File Explorer (on Windows) and in the Terminal/Git Bash Shell. So you
need to save directories in a place where you can easily see them. In your Finder/File
Explorer, make yourself a GitHub
directory that lives inside Documents
(or
on your desktop if that is a more logical place for you). Inside the GitHub
directory you will clone each of your project repositories. In the Terminal/Git Bash
Shell), you can navigate to your GitHub
directory from the computer's root by
typing: cd Documents/GitHub/ if stored in documents or cd
Desktop/GitHub/ if stored on your desktop cd means "change
directories" and in the above command you are stepping down into Documents (or Desktop)
and into the GitHub
folder. Use ls to list out the contents of the
directory you have stepped down into.
When you first use your command shell you will need to configure Git to recognize you local computer as a correspondent to your remote GitHub account. Use the following commands to configure your local Git installation (these command can be done in Terminal/Git Bash Shell without needing to specify a directory):
git config --global user.name "YOUR NAME"Be sure to use the same email address you used when signing up for your GitHub account. This will add your name and email to a file named .gitconfig in your home directory. To verify that you entered your information correctly use the command:
git config --list.For more information on the git
config command visit the Pro Git guide on configuration. Note: in order to cache your
username and password, you may need to follow further directions found on help.github.com. To test if your information has been cached try
pushing to remote repositories that you have been added as a collaborator to on
GitHub.
Projects on GitHub are stored in repos (short for repositories), which you can think of as equivalent to folders or directories on your computer. Repos can contain plain files and subdirectories, so you can use the subdirectories to organize your project files according to whatever hierarchy makes sense to you. Initially you may want to put all of your project files into the main repo directory, and as you add additional files and your project becomes more complex, you can think about creating subdirectories and distributing the files among them according to file type or other criteria. Your project mentor will advise you about how to structure the directory space for your project.
Your remote project repo will reside on the GitHub server, which is the remote server
that is accessible to others. It is possible to edit files directly on the server using
the GitHub interface, but the typical interaction with GitHub is to work on copies of
the project files a.k.a. repo clone on your own machine and
then, when you are satisfied with the state of your work, to push (upload) your new or
modified files to the remote server so that your project partners will have access to
them. Similarly, when your project partners push their changes to the server, those
won’t be reflected in the copies on your local machine until you pull (download) them.
The process of uploading files you have modified from your local machine to the GitHub
server, and of downloading from the GitHub server files that your project partners may
have developed or modified and uploaded, is called syncing (short for synchronization).
Syncing with command line requires two basic commands: git pull and
git push. The command git pull can be broken down into
git fetch and git merge, but we will discuss the
distinction later in this tutorial. When you begin a work session, you should start by
syncing your local project space with the server using git pull, so that
you’ll catch up on any changes other project contributors have made. When you reach a
stopping point in your work (when you have new or updated files
that your project partners need to see), you should commit (git
commit) and sync again, but this time using git push. You don’t
have to push after every keystroke, but you should commit regularly and push whenever
you reach a reasonably stable intermediate point to which your project partners should
have access.
The best way to initiate a new repo, for our group projects, will be to create it through the online web interface. Easy to follow instructions on how to do this can be found on help.github.com. If a repo is created through the web interface it will need to be cloned in order for you to access it and begin working on your local computer. Only one member of your project team will need to create the project repo, and all other team members will clone from that repo.
Alongside version control, one of GitHub’s most useful features is that it supports collaboration. Forget the days of emailing a file back and forth between group members as it is updated, or waiting to edit a document for fear of losing simultaneous edits. GitHub allows multiple collaborators to manage a repository. The only way to handle collaborators is through the web interface:
Settingsat the top of the screen.
Collaborators.
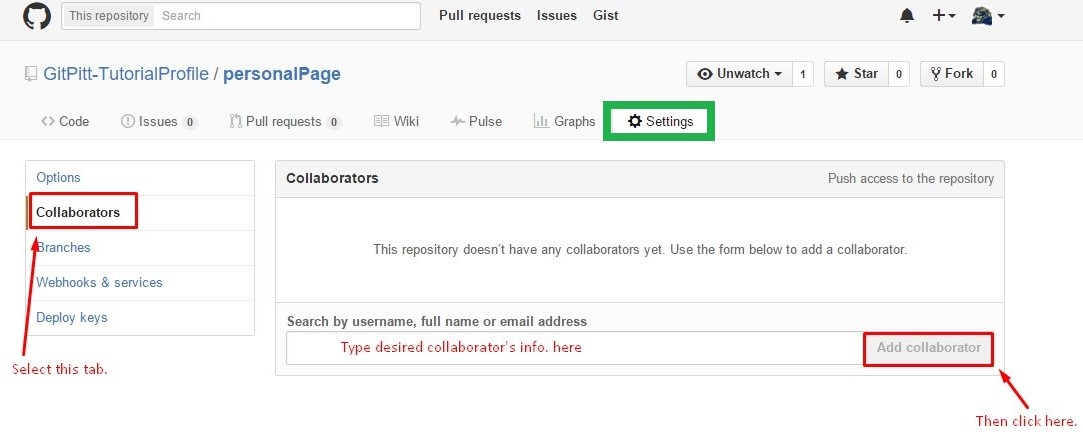
In the future, if collaborators need to be removed simply navigate this same path and there will be an option beside each collaborator to remove them.
As we explain above, the way you work on your project (create files, edit files, delete files) is to work on them on your local machine and then sync any modifications to the GitHub server, so that they will be accessible to your project partners. The Git term for copying a project from the GitHub server to your computer initially so that you can begin to work on it locally is called cloning. You only have to clone a project once, when you first begin to work on it. Cloning is the copying of a project already in existence on the GitHub server to your local computer so that you can begin to work on it; whereas, syncing is exchanging updates between your local computer and the GitHub server after you’ve already cloned the repo and established a local copy in which you can work. This working model separates saving your work to your local computer (which you should do frequently) and syncing your local clone of the repo with the master copy on the GitHub server, a design that protects you from uploading mistakes to the server. That is, you do your development on your local machine, where only you have access to the files, and when you’re ready to share your work with your project partners, you sync (upload) it explicitly to the server.
Before you clone a repo, you need to understand how to navigate between directories using Git Shell. To begin you will open your Git Shell (command line / terminal interface with Git). We explain in detail how to open this above. When opening Git Shell from a shortcut link you will be placed in the main configuration folder you set up when installing Git. The following image explains how you navigate between directories:
Again, to begin, open your Git Shell (command line / terminal interface). We explain in detail how to open this above.
To clone a repo from the remote online server using command line you use one easy
command: git clone. After git clone you copy the URL of the
repo you wish to clone.
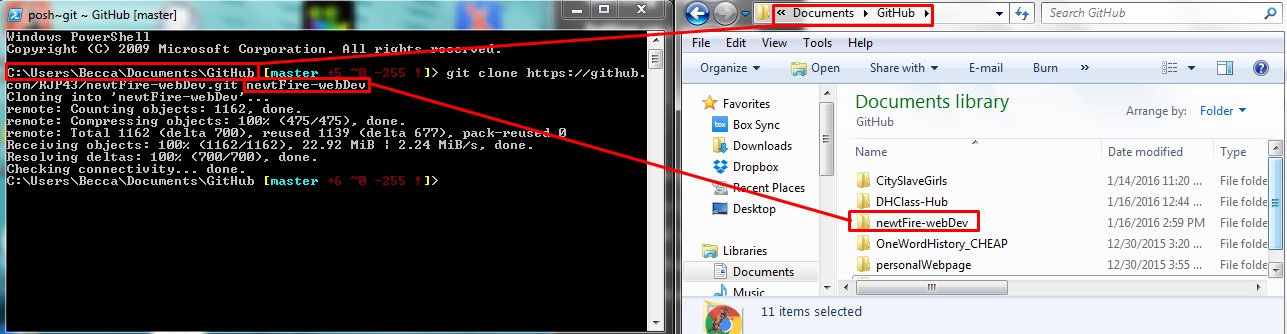
This creates a copy of the entire repository on your local machine and adds the original location as a remote so you can pull from it again and push to it if you have permissions. Note: you will only be able to directly push changes to the GitHub server if you have been added as a project collaborator. Later in this tutorial we will discuss how you can contribute to other GitHub projects that you are not a collaborator on via forking and a pull request.
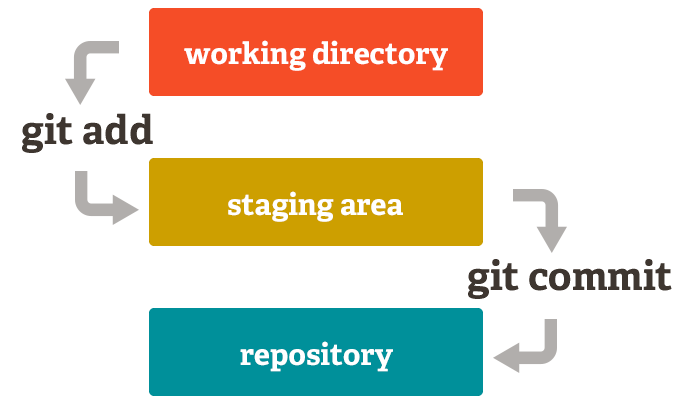
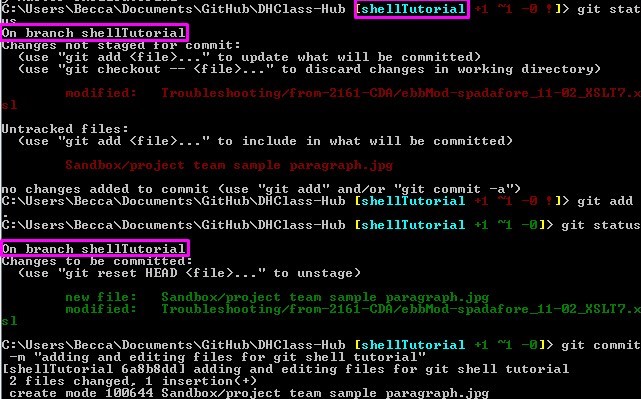
When making changes to a repo it is important to remember the three parts or your Git repo on your local machine: unstaged, staged, committed. If you make edits to a repo those changes sit unstaged until you have consciously added those changes to the staging area. This mean you could modify a file multiple times without documenting every single keystroke before asking Git to track those changes. Once you have added changes to the staging area Git will monitor if any new changes differ from what was added and mark those changes as unstaged. Staging changes allows you to review before committing.
git fetch and git merge or the single command
git pull. By using git fetch and git
merge you can first see the changes that are being brought into your
local repo (or fetched) from the remote repo. This allows for you to,
upon review, make the decision to merge those remote changes with your
local repo. The command git pull combines the two previously mentioned
commands into one step, which can be convenient yet dangerous if there is a
possibility of the changes coming in to conflict with files you may have edited
without committing. 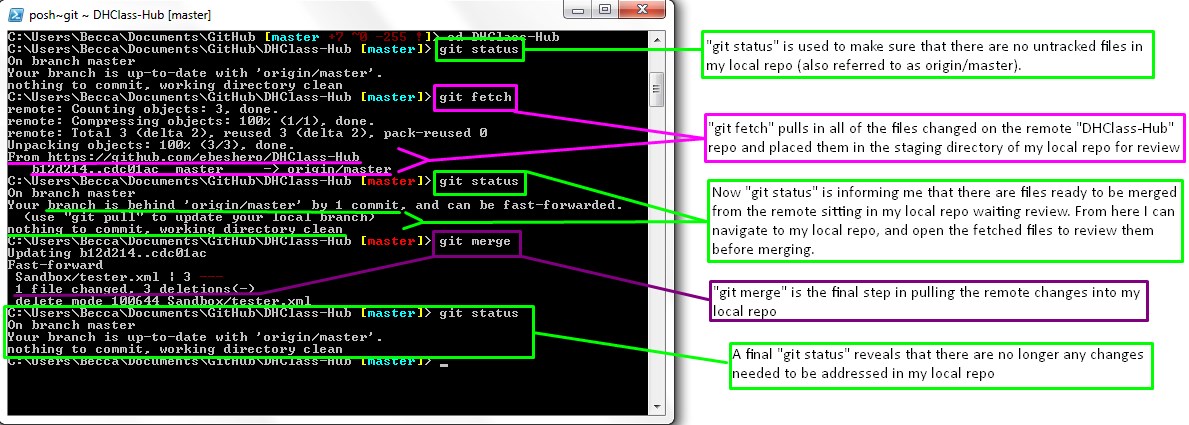 Some believe it is best practice to review all of the
remote files you are bringing into your local repo before merging. A detailed argument for always using
Some believe it is best practice to review all of the
remote files you are bringing into your local repo before merging. A detailed argument for always using git
fetch and git merge over git pull has
been made.
staging areaor
index. This is an intermediate area where commits can be formatted and reviewed before completing the commit. To stage a file, use the command
git add. If you want to stage all of the changed or newly
created and deleted files stored in the working directory you can type git add
-A. To specify that you only want to stage a certain type of file you use
an asterisk. For example: to stage all of the .html files you type git add
*.html. If there is only a single file you want to stage you can type the
filename after the command. For example: git add index.html. 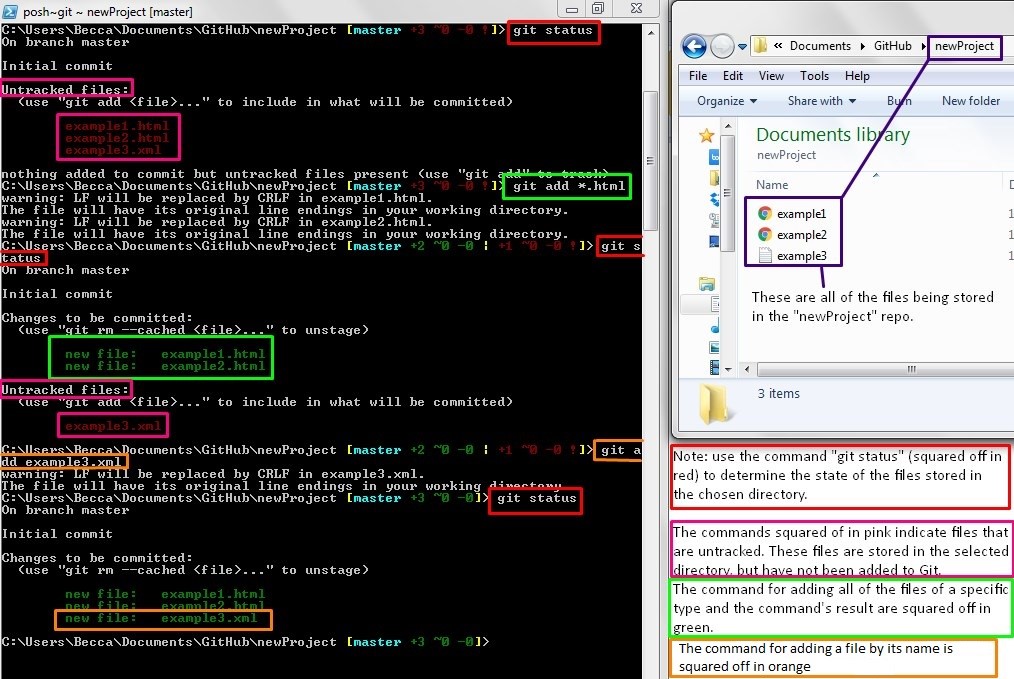
git stash. This command stashes your changes outside of
your working directory while you pull in your partner’s remote changes. You then can
return your stashed files to your working directory and continue by adding your
changes to the staging area. For more information on git stash visit the Pro Git guide on
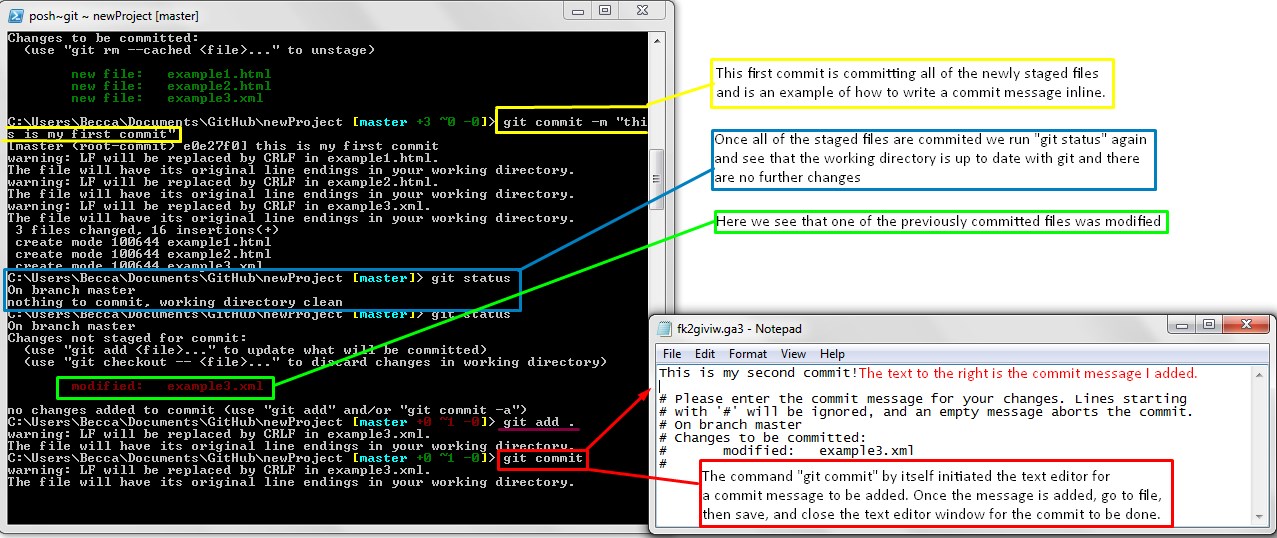
stashinggit commit. To write a commit message
right inside of Git Shell type git commit -m followed by the commit
message in quotes. Git requires a commit message when committing. Think of commit
messages as the breadcrumbs of your project for yourself and your team members;
every commit message documents changes to the project with an author and time stamp.
git push. 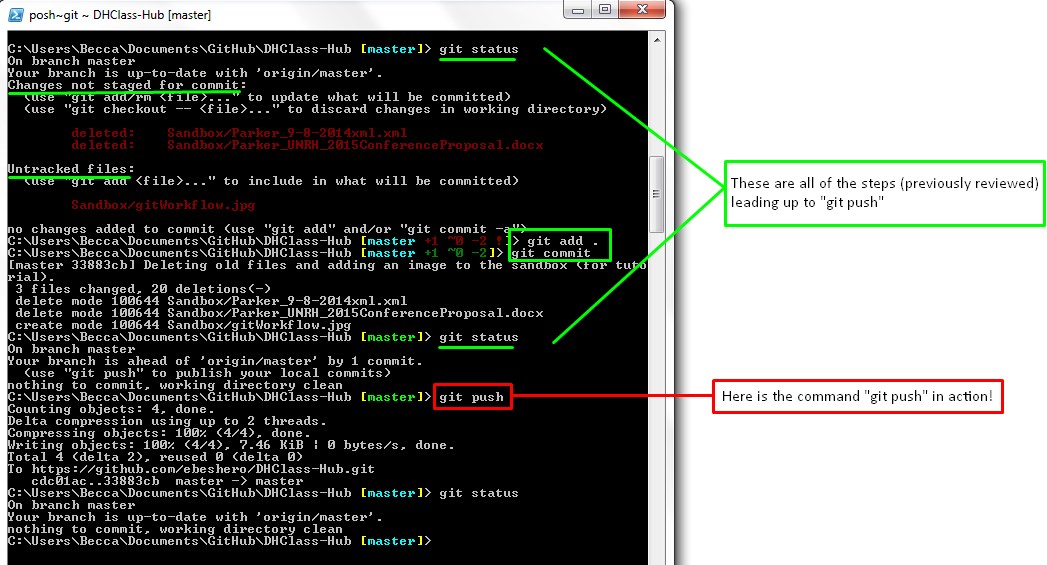
As discussed above, GitHub serves as a social media network that stores and talks to Git repositories. The GitHub interface is useful for many aspects of project management. The key parts of GitHub’s interface besides the remote storage of project files are the issues boards, wikis, and data visualizations. Wikis and issues are often used in projects to manage tasks and communicate between project team members and the GitHub community with project problems and updates. The data visualizations are helpful in mining a project’s information on collaborators and development.
To create or comment on an issue navigate to the desired repo and click on the
Issues
tab near the top of the page; notice there is also a tab for Wikis.
Issues and Wikis on GitHub are written in Markdown Language. In fact,
markdown is used for styling all forms of writing on the GitHub platform.
GitHub offers a comprehensive guide to writing markdown that we recommend you
review; however, when writing on the GitHub interface there are options similar to
Microsoft Word that can be toggled to have a specific styling applied to your text.
Besides project team communication, another important aspect of project management is
data preservation. Long-term preservation can be defined as the ability to provide
continued access to digital materials, or at least to the information contained in them,
indefinitely. A sustainable preservation program should address organizational issues,
technological concerns and the digital curation/data management process. Using Git and
GitHub already provides one means of data preservation; however, it is important to
realize that all of the data collected through the use of Git / GitHub is also important
to preserve alongside the literal files of your project. One option we have researched
to be viable for creating a backup of your Git and GitHub data is backhub.co. Another nifty tool that
we recommend you update frequently is the online digital archive of websites. By adding updates to this
site you can go back and review previous saved versions of how your website(s) looked.
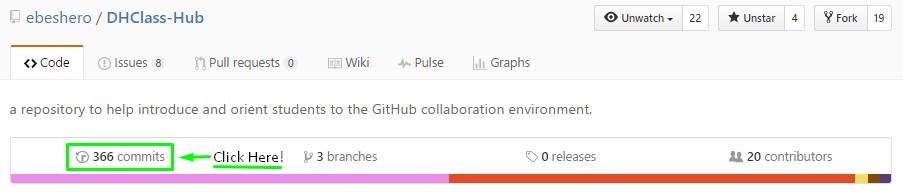
Besides data preservation it is important to also be able to mine your GitHub data. The
GitHub interface makes this really simple. In any repo, at the top of the page, there
are two tabs that are particularly useful for mining your GitHub data: Pulse
and
Graphs
. A repo’s Pulse visualizes the activity of the GitHub repo,
while Graphs visualize everything from specific user contributions to the
types of files stored in the repo. These visualizations can be useful when trying to
determine details about how the repo (and therefore project) grows and changes over
time.
We recommend our DHClass-Hub Quick Reference Guide.
Here is a list of commands used most frequently, and some options to modify the results of each command. Some of the commands listed here are associated with advanced project management while others are more basic. For commands to correct merge conflicts and bad commits please refer to our troubleshooting section. We have not listed every possible command; however we can recommend these sites to review more commands: the Pro Git Guide, siteground.com, atlassian.com, and orga.cat. Another really great thing about Git is that it has been in existence since 2005 and is used widely among computer programers; therefore, the resources on Git and Git commands are vast!
git
help: possibly the most useful Git command, this command allows you
to search the most common Git commands in the command/terminal shell. If you follow
this command with another command or concept (i.e.. git
help push) Git generates a html page detailing the command or
concept as well as possible options for its use.git
init: initializes a git repository by creating the initial .git
directory in a new or in an existing project.git
clone: copies an existing GitHub repo to local machine.git
status: checks the working directory to see if up-to-date with
the remote repo.git add:
a.k.a. staging changes, adds changes to staging area of the working directory. This
command is the first step in committing changes to your local version of the repo
before pushing them to the remote GitHub version of the repo. By adding
-A
(git add -A) Git adds, modifies, and
removes ALL entries to match the working directory. To specify that you only want to
stage a certain type of file you use an asterisk. For example:
to stage all of the .html files you type git add *.html. If
there is only a single file you want to stage you can type the filename after the
command. For example: git add
index.htmlgit
commit: tells Git to record the changes made to your version of
the repo. Every commit needs to have a message that explains what files have been
edited/added. After the command add -m and then the commit message in
quotes (git commit -m "This is where your message
goes"). You can skip the command git add by using
git commit -a -m followed by your commit message. However, best
practice is to add and commit in separate steps so you are aware of the files being
added before making the commit. If you ever find yourself annoyed with your own
commit message, before you push you can actually amend your commit using: git
commit --amend. Don't use this after you've pushed (it's like revising
history then--it would tangle up everyone's repo histories to amend once you've
pushed).git
stash: used when you want to record the current changes to the
working directory, but want to go back to a clean working directory without forever
losing those changes and without adding them to the staging area. This command saves
your local modifications temporarily outside of your working directory and reverts
the working directory to match the last commit (typically used
so you can pull in remote changes to a clean directory while avoiding possible
merge conflicts and keeping your changes available). The modifications
stashed away by this command can be listed with git stash list,
inspected with git stash show, and restored (potentially on top of a
different commit) with git stash apply. git
pull: this command is made up of two other commands (git
fetch and git merge) and is used to fetch the data from a
remote repository and merge it into your local computer’s version of the repository.
If working in a fork it is important to remember that changes are pulled from the
original remote repo the fork is made from: git pull upstream master.
When pulling from the original repo of a fork it is necessary to set that original
repo as a remote origin (called upstreamin the previous example).
Masterrefers to the branch of the original repo of which the changes are being pulled from, and can be changed to any branch name of that original repo that the desired changes reside in.
git
remote: used to retrieve a list of remote repositories associated
with local repository. To create a new remote association use git remote
add followed by a name for the remote branch (i.e. upstream) and then the
URL of the remote repo on GitHub. git remote -v displays a verbose list
of the associated remote repos with the remote URL after the repo name.git
push: updates remote repos to match commits made on local machine. If
working in specific branches you can designate the branch name (that you wish to
push) after the command, or use git push -all to add commits from all
local branches.git
branch: used to work inside of branches. This command followed by
a branch name creates a new branch. For a list of both remote-tracking branches and
local branches use git branch --list. Frequently branches are used for
experimental development that may or may not be incorporated into the master branch
of the repo. Having these changes in a branch prevents the master branch from bad
commits and uncertain files.git
checkout: followed by a branch name allows you to switch into the
working directory of a specific branch. git
diff: followed by the names of two branches allows you to compare the
differences between the two branches. For example: git diff master
development will show the differences between the master branch and the
development branch. If you want to just get a list of the files changed between the
two branches you can change the command to git diff --name-only again
followed by the names of the two branches you wish to compare.If you are reading this section you probably are at a fearful state of emergency with your project repo due to a merge conflict. The first thing that you should keep in mind however is that you can always undo the changes causing a conflict and go back to the state before the conflict occurred. Another benefit of using Git over many other VCSs is that a merge conflict will not bring your complete team to a halt or cripple your remote project repository. This is because, in Git, conflicts can only occur on a single user’s local machine. In Git, merging is the act of integrating another branch into your current working branch: most often taking changes from a remote branch and combining them with your current working directory on your local machine. Typically Git can seamlessly integrate multiple changes from multiple collaborators; yet, occasionally Git runs into a scenario where the changes overlap thus causing a merge conflict.
When faced with a merge conflict, the first step is to understand what happened. Did one
of your team partners edit the same file on the same lines as you? Did they delete a
file that you modified? Did you both add a file with the same name? Using the command
git status will tell you where you have unmerged paths
or
conflicts. The most common conflict occurs when one partner makes a change on a
particular line in a file, and a fellow team member makes a change on the exact same
line. Git does not automatically assume the last person to push changes is correct and
should over-write the other’s changes. When this sort of conflict occurs, Git writes a
special block into the file that contains the contents of both versions where the
conflict occurred. To complete this type of merge, use <oXygen> (or other text editor) to resolve the conflict, then add the
file and commit it to complete the merge. In the file, Git automatically adds conflict
markers to the affected areas. A conflict-marked area begins with
<<<<<<< and ends with
>>>>>>>. The two conflicting blocks themselves are
divided by a =======. You have several options here. You can either keep
your changes, take your partner’s changes, or make a brand new change. Whatever you do,
you need to make sure to resolve the conflict such that the file makes sense, and
everyone is happy. The goal is to get the file to look exactly how you want it. You’ll
delete the conflict markers, and just type out a new change or remove the unwanted/wrong
lines. Once you have made those changes you can use git add and follow
through with making a new commit to push to the remote. Opening the file in your editor
and cleaning it up there is perfectly valid, but can be jarring and difficult to
distinguish the changes. Using a dedicated merge tool (like Meld or Kaleidoscope)
can make this easier (if you have one installed). You can
configure your tool of choice using the git config command. Consult your
tool’s documentation for detailed instructions. Then, in case of a conflict, you can
later invoke it by simply typing git mergetool.
Outside of the above solution there are a few other ways of fixing possible merge conflicts and getting rid of bad commits. The need-to-know Git commands for merge conflicts and bad commits based on the conflict and state of the local repo are:
git stash: this takes all the changes in your working
directory and saves them on a new clipboard. Leaves the local working directory
clean; you have no more local changes. Later, at any time, you can restore the
changes from that clipboard in your working directory and continue working where you
left off. To get a list of all your stashesuse the command
git stash
list. When you’re ready to restore a saved Stash, you have two options:
use git stash pop to apply the latest stashand clear it from your stash clipboard or use
git stash apply followed by the stash name
to apply that specified stash. The second option keeps the stash on the clipboard, and it can be deleted later via
git stash drop followed by
the stash name. git
revert: is used to undo a previous commit(s) by
introducing a new commit that reverses an earlier one. This doesn’t change the
project history, which makes it a safeoperation for commits that have already been published to a shared repository (i.e. the GitHub remote repo).
git
reset: is used to undo changes in your working
directory that haven’t been committed yet. If you do not want to loose your local
changes or the changes from the commits being rolled back use git reset
--keep followed by HEAD or the commit hash ID. If you have
decided you want to be rid of all current local changes use git reset
--hard. This will cause you to loose all current local changes. If you
are unsure that you want those files best bet is to be safe and use git
stash before this command.git
clean: removes untracked files from your working
directory. This command is often executed in conjunction with git reset
--hard. Remember that resetting only affects tracked files, so a separate
command is required for cleaning up untracked ones. Combined, these two commands let
you return the working directory to the exact state of a particular commit.Note: When resetting or reverting a repo you can chose the commit to reset/revert back to
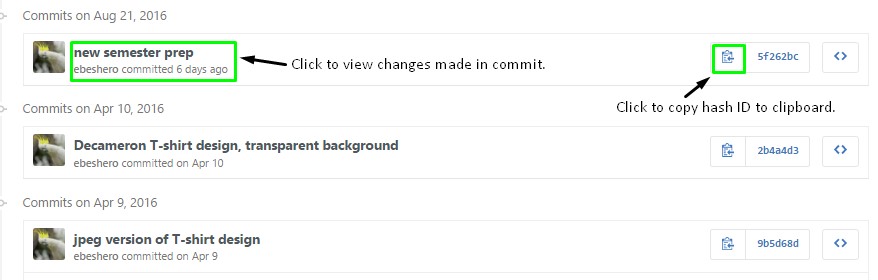
by grabbing the commit hash ID from that commit. A simple way to find commit hash IDs is
to use the GitHub interface by viewing all of the commits in a repo. If you simply want
to go back to the last commit use HEAD after the command instead of the
commit hash ID.
The atlassian.com tutorial on undoing changes, the Pro Git blog titled Reset Demystified, GitHub help guide to merge conflicts, and the git-tower.com ebook are our go-to sources for fixing and preventing merge conflicts and bad commits.
Branching means you diverge from the main line of development and continue to do work without messing with that main line. The master branch is the main branch of a project. When working in projects with multiple collaborators it may be important that the master branch not have errors, and always be in good working order. If everyone is writing new code into the master branch, it’s possible for the master branch to enter an unstable state temporarily. To avoid that, projects may require that all developers work on different parts of the project separately, in their own branches, and merge their individual development branches into the master branch only once they are confident that it won’t have a destabilizing effect. This can be useful even in single-developer projects if you need to maintain multiple versions, such as a stable branch that people should be able to download and use and a development branch that will eventually become the new stable branch, but that isn’t yet stable. Branches can be merged and deleted because a branch is an inalienable part of the repo in which it is created in; thus, working in a branch requires you to already have a cloned repo. Just to be clear, when you clone a repo that has existing branches the entire repo gets cloned including all of the repo’s existing branches.
To really understand the way Git does branching, we need to take a step back and examine how Git stores its data. As stated above, Git doesn’t store data as a series of changesets or differences, but instead as a series of snapshots. When you make a commit, Git stores a commit object that contains a pointer to the snapshot of the content you staged. This object also contains the author’s name and email, the message that you typed, and pointers to the commit or commits that directly came before this commit (its parent or parents). A branch, in Git, is simply a lightweight movable pointer to one of these commits. The default branch name in Git is master. As you start making commits, you’re given a master branch that points to the last commit you made. Every time you commit, it moves forward automatically.
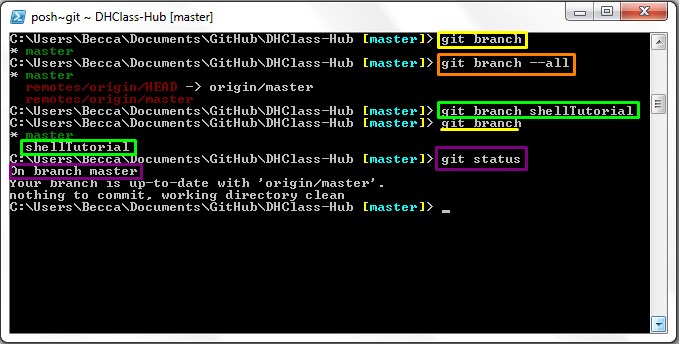
Before creating a branch it is important to note what branches are already a part of your
local repo. To do this we use the command git branch. This command lists
all the branches only in the local repo. The master branch came automatically from the
source repo upon cloning as the main branch of the repo. To see all of the local
branches, including the master branch, and the remote branches that can be pushed to we
use the command git branch --all. Now to create a new local branch use the
command git branch followed by what you wish to call the branch. For
example: git branch development will create a branch called
development
. To verify that a new branch was added, re-run the git
branch command. You should now see the new branch. The star to the left of a
branch name indicates where you are working, and this can be verified with git
status. When you run git status Git Shell should return a line
listing what branch you are on. For example: if you are working on the master branch Git
will return the line On branch master
.
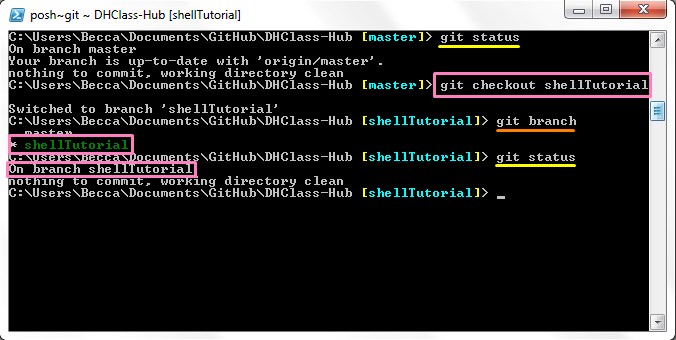
If you want work to appear under a specific branch you will need to switch to the desired
branch before committing changes. To switch branches use the command git
checkout followed by the name of the branch you wish to switch to. For
example: git checkout development will switch you over to the
development
branch.
You can verify that you have successfully switched branches by using either of the
previously explained commands: git branch or git status.
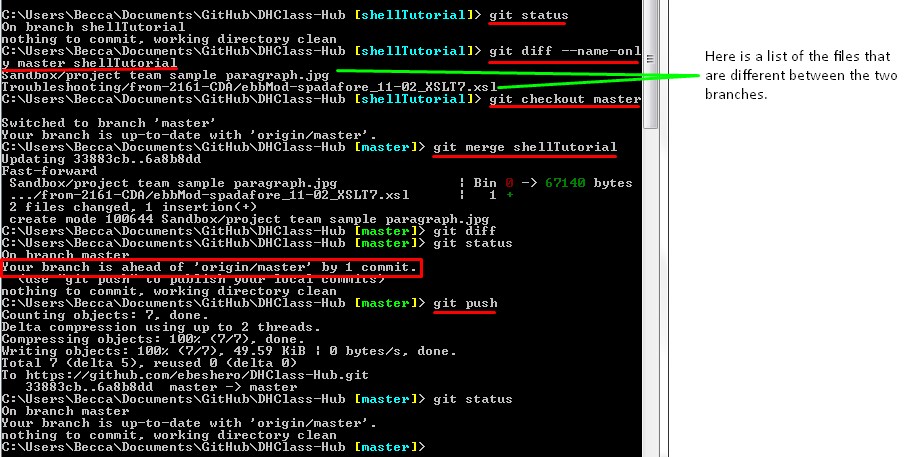
Once there have been changes made via a branch and you wish to combine those changes with the main (master) branch, you will need to do the following:
git diff followed by the names of the two branches you
want to compare. For example: git diff master development will show the
differences between the master branch and the development branch. If you want to
just get a list of the files changed between the two branches you can change the
command to git diff --name-only again followed by the names of the two
branches you wish to compare.git status or git branch to verify what branch
you are currently working in. If you are not on the master branch you should switch
to it using git checkout master.git merge command followed by the name of the branch
being merged into the master branch. For example: git merge
development.git diff again with the
two branch names, and if Git does not return anything that means there are no
differences between the two branches.git status it will show that local master is ahead of
the remote origin. To fix this and bring the remote origin repo up to date with your
local master, run the git push command.
If you have done work in a branch, and you do not want to merge the changes into the
master branch until others on your team have reviewed it you can push the branch and its
changes before merging. As long as you have the branch selected in Git Shell, you can
use the command git push origin followed by the name of the branch to
update the remote repo with the new branch. For example: git push origin
development will push the development branch and its changes to the remote
origin. Now if another collaborator wishes to clone the repo, and bring in your branch
to their local repo they will be able to do so.
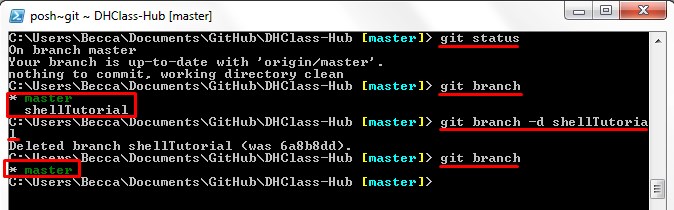
Some branches are created only temporarily; therefore, you may desire to delete a branch
before or after merging. The command git branch -d followed by the branch
name will delete the specified branch; if the branch is not fully merged in its upstream
branch or contained in the current branch, this command will fail with a warning.
Otherwise if the branch has been successfully merged with another branch then the
command will go through and the branch will be removed. Use git branch to
verify deletion. If you wish to remove the branch whether it has been merged or not the
command is altered slightly: git branch -D followed by the branch name.
Part of the open-source etiquette of GitHub is that developers are encouraged to copy and then improve code originally created by others in a separate forked repo. GitHub supports the creation of derived projects through forking. When you fork a repo, you create a copy of it under your own account, where it acquires an independent identity. You can do anything with a repo you created by forking someone else’s project that you can with a repo you created from scratch. The moment that you create the fork, your new repo is no longer synchronized with changes in the repo from which you copied it originally. If you fork a repo and make changes that you would then like to contribute to the original source, you can issue a pull request, inviting the developers of the original repo to merge your forked repo’s changes into their original project.
To begin forking you need to navigate to the repo you wish to fork, and select the
fork
button in the top right of the page.

Next, you will need to navigate to the new forked repo created on your account. From
here, follow the steps above on cloning, and clone the repo using
git clone and the HTTPS of the forked repo. Make sure you are cloning
the repo that is located on your account and not the source repo you forked from.

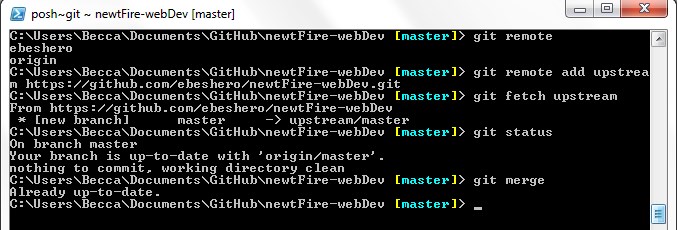
In order for the forked repo to reference the source repo, you will need to set up the
remote upstream. Do this with the following command: git remote add
upstream followed by the HTTPS of the source repo. Use the command git
remote or git remote -v to show all of the remote versions of
your repository. You should see origin
(the direct remote version of the forked
repo) and the upstream you just created. When you want to bring any new changes made on
the source repo’s master branch into your forked repo, you can use the following
commands to do so: git fetch upstream master will show the changes able to
be brought in and git pull upstream master will bring the changes in. These
commands function the same way in a fork as they do in any cloned repo.
In the branching section of this tutorial we discussed why using a
branch is good practice. When working in a forked repo, branching becomes even more
important and practical. The master branch is better to be left free of
developmental/experimental changes so that it can be used to sync with the upstream
(source repo). Therefore, it is best to add and change files in branches of your fork.
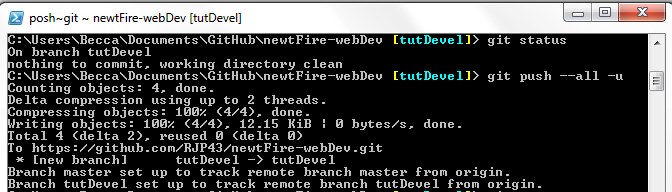
After you have created a branch, modified files, and committed said changes use the
command git log --pretty=short to see a listing of commits. Finally, to
push all the local branches and change to the forked remote use the command git
push --all.
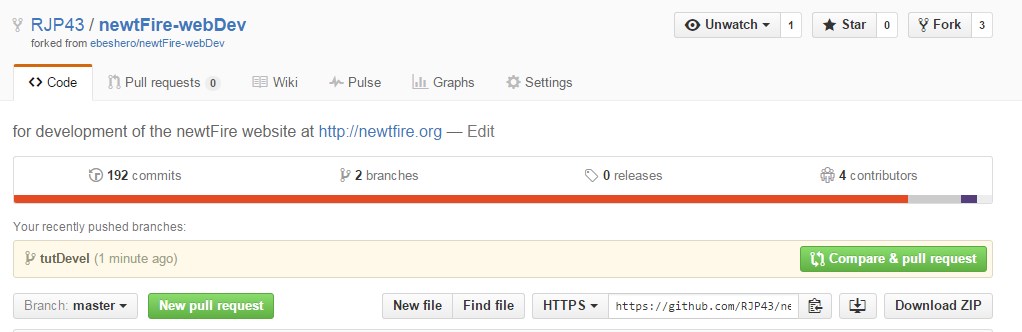
Now if you go back to your fork on GitHub, you can see that GitHub noticed that we pushed
a new branch with changes to the source repo’s code. GitHub presents us with a big green
button to compare our changes and open a Pull Request to the original
project. You can alternatively go to the Branches
page at
https://github.com/[username]/[repo name]/branches to locate your branch and open a new
Pull Request from there.
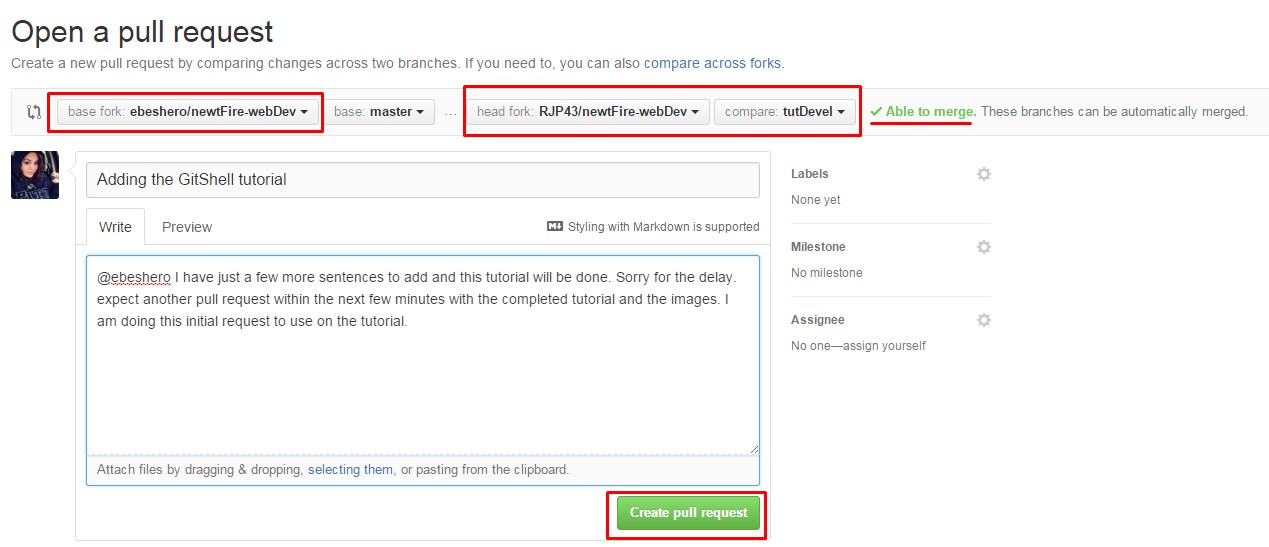
If you click that green Pull Request
button, you’ll see a screen that asks you to
give your Pull Request a title and description. It is always worthwhile to put some
effort into this, since a good description helps the owner of the original project
determine what you were trying to do, whether your proposed changes are correct, and
whether accepting the changes would improve the original project or not. You can also
see a list of the commits in your forked repo’s branch that are ahead
of the
master branch. Should this branch get merged by the project owner, a unified diff
of all the changes will be made.
When you hit the create pull request button, the owner of the project you forked from
will get a notification that someone is suggesting a change with a link to a page that
has all of the information you provided. At this point, the project owner can look at
the suggested changes and merge it, reject it or comment on it. It is possible that the
owner will ask you to rebase from master
and resubmit a pull request. This might
happen if a series of changes were made on the source repo’s master branch that you had
failed to fetch or if such changes were made after you submitted your request. This is
not a problem! Use this very thorough YouTube video
to guide you through how to do this.
Git and GitHub can be a bit confusing for new users, but it makes project management much more robust than the available alternatives, and learning to use it is worth the effort. This tutorial is designed to get you started, and your instructors and mentors are available to advise and help if you get stuck or confused. There are a number of resources online to further your knowledge, some of which can be found at the following links:
Getting Git Right@ atlassian.com
Git - the simple guide